Tutorial
This tutorial’s goal is to provide some simple examples to configure the When applet to do useful things. Since it is a background application, the examples shown here will focus on operations that would normally take place without user interaction, such as file synchronization, file system housekeeping and so on. However When can be used for many other tasks, such as automated builds, gathering information, massive file conversions and so on.
Assumptions
When is explicitly aimed at Ubuntu desktops. Probably it would work on
other Linux flavors too, and especially on Ubuntu derivatives, maybe exposing
full or almost full functionality. However, for the sake of this tutorial,
I’ll assume that the user is running When on Ubuntu 14.04 LTS or a more
recent release. Within the document the Ubuntu “idioms” will be constantly
used, and the examples will favor utilities such as apt-get and dpkg
with respect to the corresponding yum and rpm of RPM-based distros.
bash is assumed to be the main shell, and will be used in scripts and
interactive shell examples, and administrative tasks will be prefixed by
sudo as the Ubuntu custom suggests. Packages existing in standard
repositories will be referenced by their Ubuntu names. Since many packagers
have followed almost the same conventions to organize common packages on Linux
systems, it should not be too difficult to find appropriate name conversions
online.
I’ll also assume that the following packages have been installed:
python3-gixprintidlepython3-pyinotify
as suggested in the documentation, as well as the When package from the
provided .deb file, following the suggested “easy” installation method,
and that the when-command executable is in the path. The applet itself
is assumed to be installed in the desktop and initialized for the user via
$ when-command --install
and that the configuration still has not been modified from the default one provided at initialization time. Long story short, I assume the user to have a working default installation of When on a recent Ubuntu desktop.
Support Software
Some examples will use third-party open source software to perform tasks. For example, I wrote When to be able to run Unison unattended on idle time. Unison is a (beautiful and) useful piece of software, that doesn’t come with Ubuntu by default: in some examples the tutorial will also require the user to install and configure Unison and other software.
Scripts
In some cases it’s easier to group actions in shell scripts, or even to write simple programs, instead of relying on When‘s sequential task run ability. In such cases, apart from being embedded in the tutorial text, the scripts are available in source form for download.
All possible effort is taken to make the scripts portable without modification, and to make unavoidable modifications as easy as possible. In the latter case, there will be instructions on how to modify the script.
The Examples
The provided examples illustrate simple tasks that could serve as a starting point to build more complex actions. Me too, I started developing When with very simple goals in mind. Then When ended up including more interesting features on which I also built some tools – one of them is even used to help develop When itself. The provided examples are about
- File Synchronization and Backup
- Housekeeping
- Automatic Import from a storage device.
The examples will try to cover the entire process of creating the tasks, their trigger conditions and all the accessory parts and scripts needed for each example to work from scratch. In particular, the tutorial will also try to guide the user through the configuration process when different settings from the default ones are needed.
File Synchronization and Backup
The first example illustrates how to synchronize files from a directory to a
backup destination. It uses Unison to copy the files from the source
location to the destination, only in one direction, whenever the contents
of the source directory change: in other words it implements a
file change condition to determine whether or not to backup the source
directory. Because such condition checks are always deferred, subsequent
writes to a file in the origin directory will not likely trigger the same
amount of synchronizations, which is good for backup tasks. Here we will
synchronize the ~/Documents directory with a mounted location. We’ll
assume there is a NFS disk mounted on /remote, with a directory owned
by the user and named after the user name. To prepare the environment, a
proper backup location has to be created, via
$ mkdir -p /remote/$USER/backup/Documents
in order to keep the environment as clean as possible. The path above is supposed to act as a backup directory only, and to be left untouched unless in case of need: this ensures that synchronization will always be unidirectional.
For this example to function, the file change conditions have to be enabled. To do this, open the settings dialog box by clicking on the applet icon in the top panel and selecting Settings....
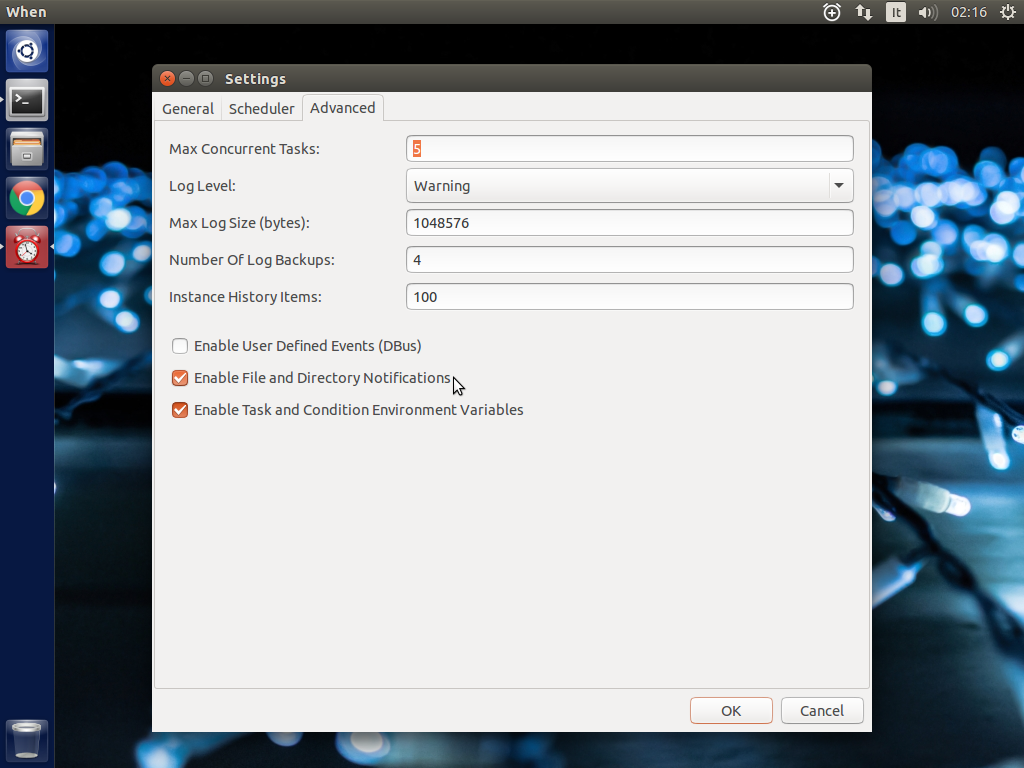
Then click the Advanced tab and check the Enable File and Directory Notifications entry. When has to be restarted for the option to actually work: choose Quit from the applet menu, then start When from the dash.
Install and Setup Unison
A brief description follows on how to setup a simple profile in Unison for the sake of this example. This utility can do much more, refer to the specific documentation for details.
Installation
In Ubuntu Unison is provided in the official repositories, namely in Universe. If that repository is enabled, you can install the software using
$ sudo apt-get install -y unison unison-gtk
or via the Ubuntu Software Center. In this way you can use the Unison GUI to configure the synchronization profile: launch Unison from dash to access its interface (logout and login might be required to find the application in dash).
Setup a Synchronization Profile
Open the Unison GUI: the main window will be presented, along with a dialog box to select the profile to run. As there are no configured profiles, we will click the Add button, and a wizard will help us with the creation of a profile.
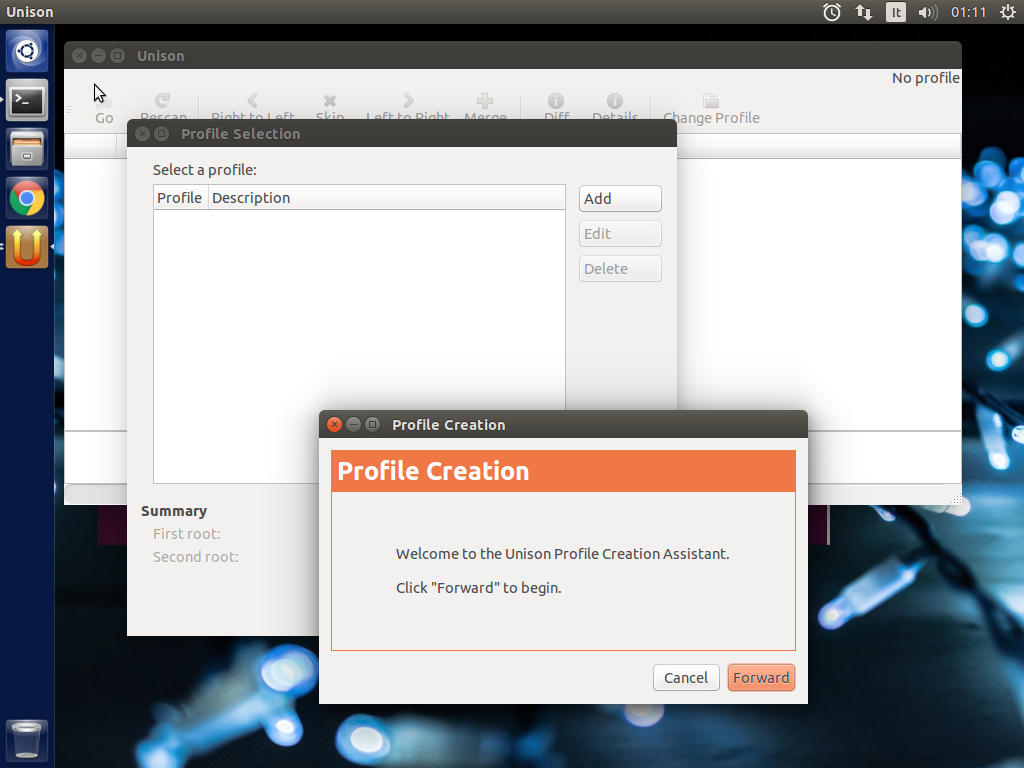
Click Forward and follow these easy steps:
- Give the profile a name,
DocsBackupfor brevity, and a meaningful description: something like “Backup documents to a remote location” would do the job. - Choose Local as synchronization kind because a NFS mounted file system appears as local to Unison.
- Choose your main Documents folder as first directory, and browse to
/remote/<your_account>/backup/Documentsfor the second folder using the Other... entry in the choice box. - Obviously leave the option for FAT partitions unchecked.
- Click Apply.
A basic profile is now created, which is enough for our purposes. The profile
name, DocsBackup, will be used in the command passed to When to let
it perform the synchronization task.
To let When only do routine jobs, run the profile interactively by opening it (use the Open button after selecting the profile). A dialog box appears, to show that it’s the first time that the folders are synchronized: accept it, and click Go in the Unison main window. Now Unison can be closed.
Create a Task
Click the When clock icon on the top panel, and select Edit Tasks... in the menu. The Task creation dialog box will open.

As the screenshot suggest, a name has to be entered in the first dialog box
field: we choose SyncDocs, which is mnemonic enough. In the Command
entry, the following command line has to be entered:
unison -auto -batch -terse DocsBackup
This tells Unison (the non-graphical utility) to perform a synchronization in automatic mode, asking no questions and with brief output. The other entries in the dialog box are left alone: the working directory is not influent, and we only care to know whether or not the synchronization task succeeded by interpreting the command exit status. As it mostly happens with command line utilities, Unison will return a zero exit code on success, and the other entries in the box just tell When to consider this.
Click OK to create the task.
Setup a Condition
We are interested in propagating changes in the source directory to the backup directory. The ideal solution is to create a condition based on file and directory changes. Click the When clock icon on the top panel, and select Edit Conditions... in the menu. The following dialog box will let us define such a condition.

Then we will follow these steps:
- Give the condition a meaningful name, such as
SyncDocsOnChanges. - Select File Change in the drop-down list below.
- Click the Choose... button and select the main documents folder (that
is,
~/Documents); alternatively the full path could be entered in the Watch Files field, which has the same effect. - Click the drop-down list under the list of tasks, and select
SyncDocs, then click the Add button on its right. - Click OK to enter the new condition.
All the other fields should be left alone: in this way the checks are periodic (otherwise the synchronization would only take place once per session), while the other options are ininfluent in this case, as there is only one task for this condition.
Work and Let When do its Job
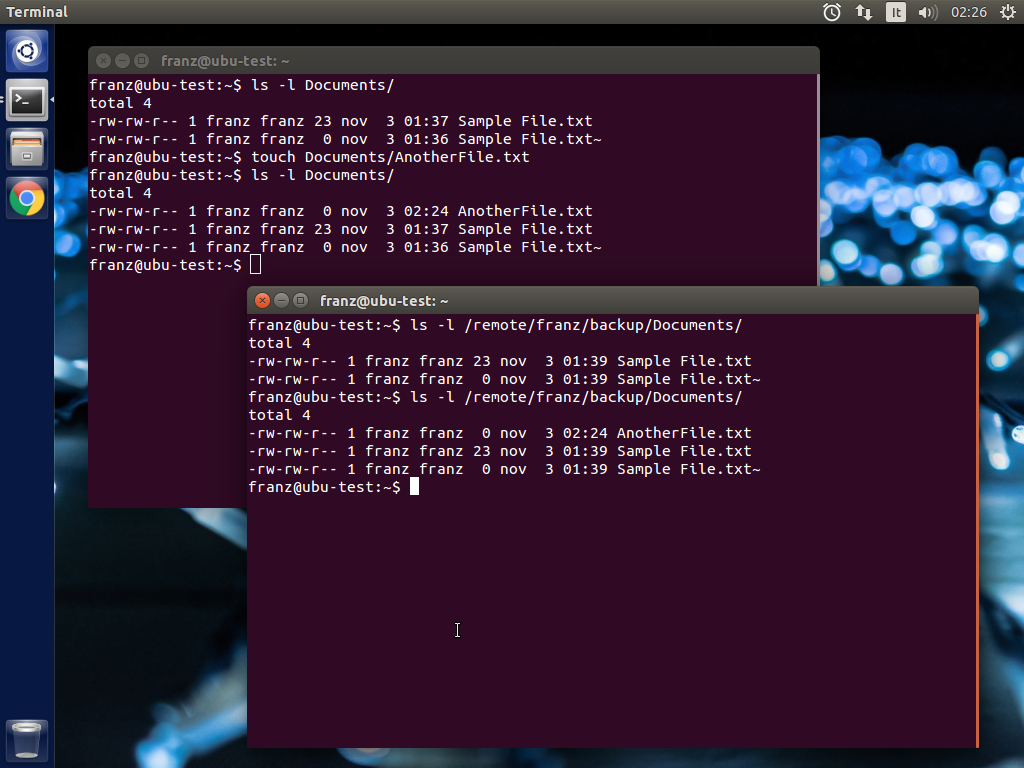
We are ready now: we should only check that changes in the source directory
are reflected in the destination. A simple test will consist in the creation
of a file in ~/Documents:
$ cd
$ touch Documents/AnotherFile.txt
$ ls -l /remote/$USER/backup/Documents
The following screenshots show how it worked: first is before creation
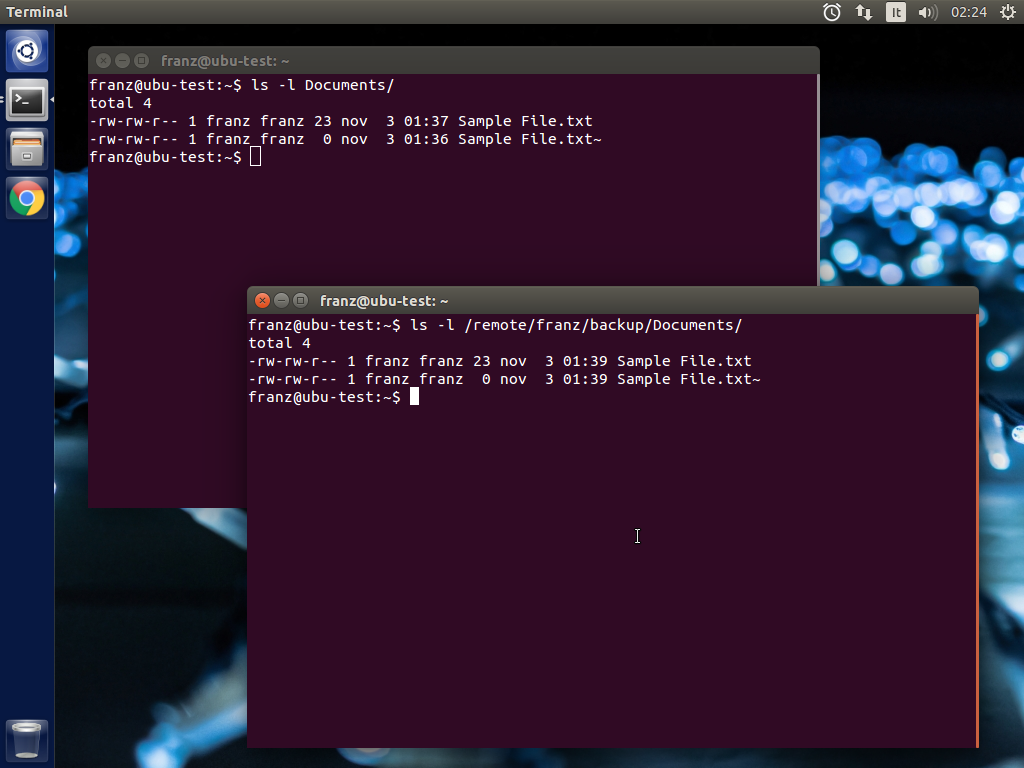
and after:
To check outcome directly from the When interface, we can open the history window, by choosing History... in the applet menu.
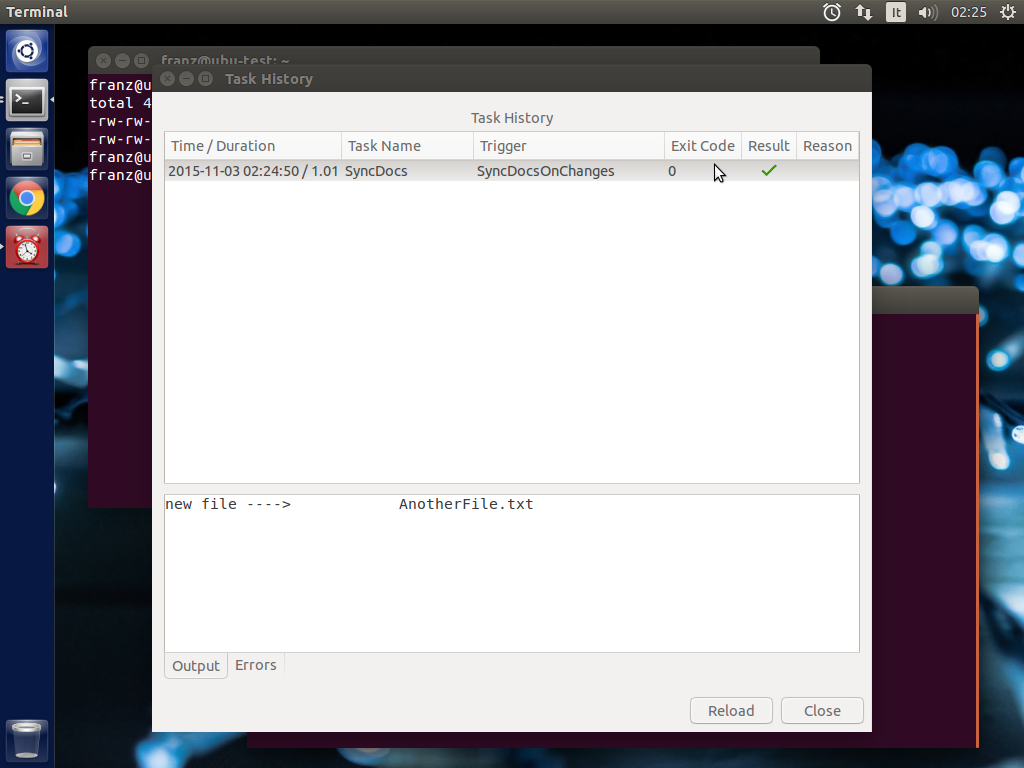
This dialog box also shows the (brief) output of the command, which is useful to identify task outcomes. If we click on the list items, the panes below will show output (stdout and stderr) for the selected task.
Housekeeping
In this tutorial we will instruct When to perform some simple
housekeeping in the Documents directory when the session has been idle for
a while. For the example we will use a minimal shell script that removes the
files that end in the tilde character (usually backups) and sends them to
the trash can. We need to use the trash command, which can be installed
with the trash-cli package:
$ sudo apt-get install trash-cli
An alternative could be to directly remove the files, but this would be more dangerous and we want to keep some kind of control on what is actually removed from the disk.
Write the Shell Script
Our script is essential, as said above, but nothing forbids to let it do more
complex tasks. To keep the things somewhat standard, we will put the script
in the ~/.local/bin directory. At a terminal prompt, do the following:
$ mkdir ~/.local/bin
$ cd ~/.local/bin
$ gedit housekeep.sh
When the Gnome editor starts, enter the following text:
#!/bin/sh
find . -path ./.local/share/Trash -prune \
    -o -type f -name '*~' \
    -exec echo '{}' \; \
    -exec trash -f '{}' \;
save the file, exit the editor and from the same terminal window run
$ chmod a+x housekeep.sh
to make the script executable. The reason for the line that discards stuff
in ./.local/share/Trash is that we don’t want files already in the
trash bin to be handled again, and we are pretty sure that such a folder
only exists in the user home directory – so that this limitation only
has effect when the startup directory is the home directory.
The housekeep.sh script is available here.
Create the Task
From the When menu select the Edit Tasks... entry. When the
task editor box shows up, choose a meaningful name for the task:
DocumentsHousekeeping will do the job. Then insert the following text
in the Command field:
/home/<your_account>/.local/bin/housekeep.sh
(where <your_account> should be changed to your account name). Hit the
Choose... button to select the working folder and navigate to select the
~/Documents directory. This is actually the reason why we just told the
find command to start in the current directory: When will change
directory for us before starting the script, and we can use the same script
to create tasks that perform housekeeping in other directories, just changing
the startup directory.
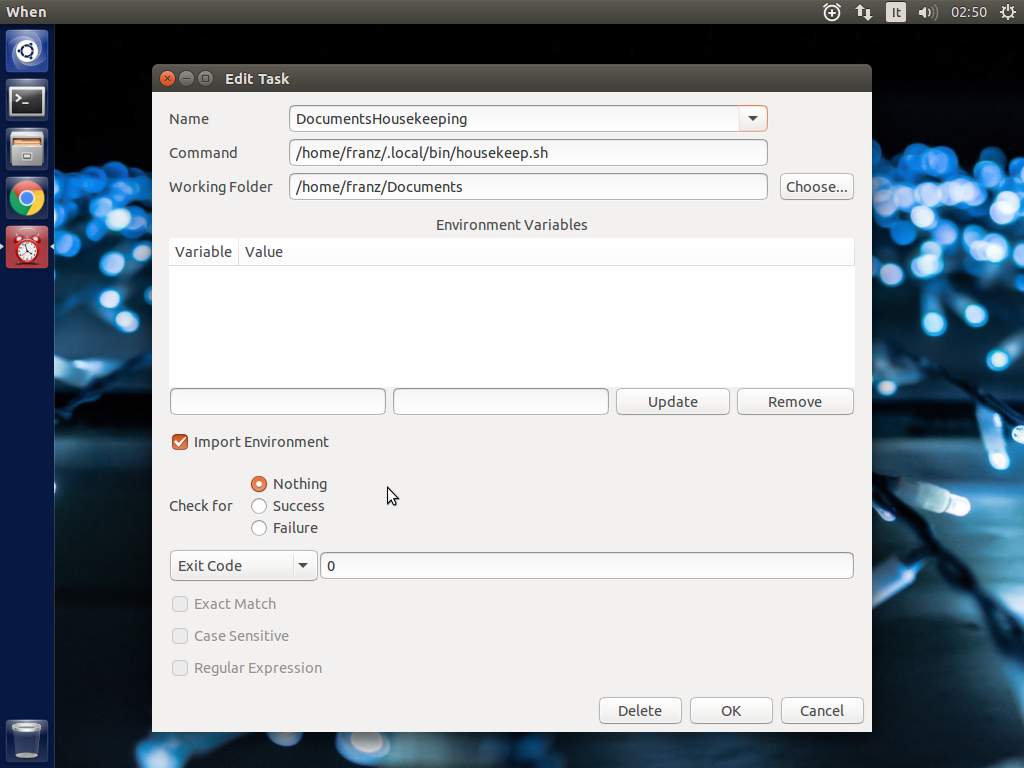
Since we really don’t care about task outcome and we don’t want When to throw an error when this task fails, we also select to check for Nothing as outcome.
Click OK to accept the task.
Setup the Condition
We want this task to occur whenever the session has been idle for, say, three
minutes. It’s not a very expensive task, so we accept it to run more than
once per session. To create the condition, select Edit Conditions... from
the applet menu. In the condition editor choose a meaningful name for the
item, such as DocumentsHKeepOnIdle, and choose Idle Session from the
drop-down list. Specify 3 in the Idle Minutes field, then using the
drop-down list below the task list, choose the DocumentsHousekeeping task
and click the Add button on the right. We can leave the other entries
alone.
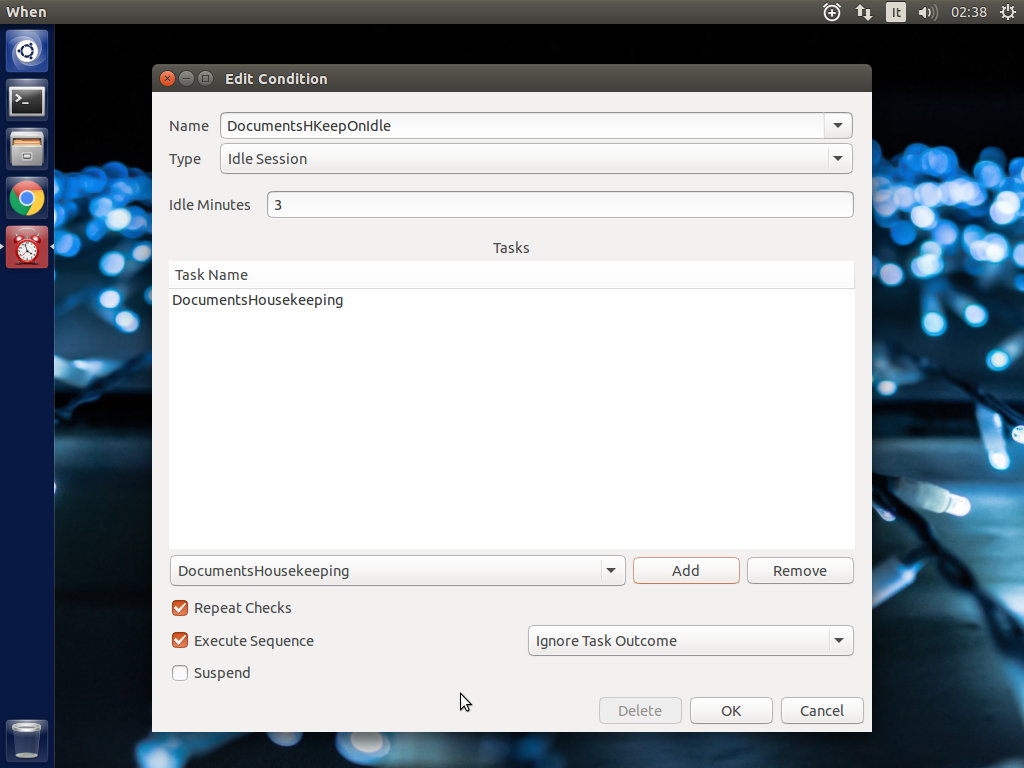
Click OK to accept the condition, and we’re done.
Verify that Everything Worked
After three or four (When is a lazy applet, though) minutes, you can open
the History box by selecting Task History... from the applet menu. The
window will show DocumentsHousekeeping triggered by
DocumentsHKeepOnIdle in the main list, possibly among other tasks.
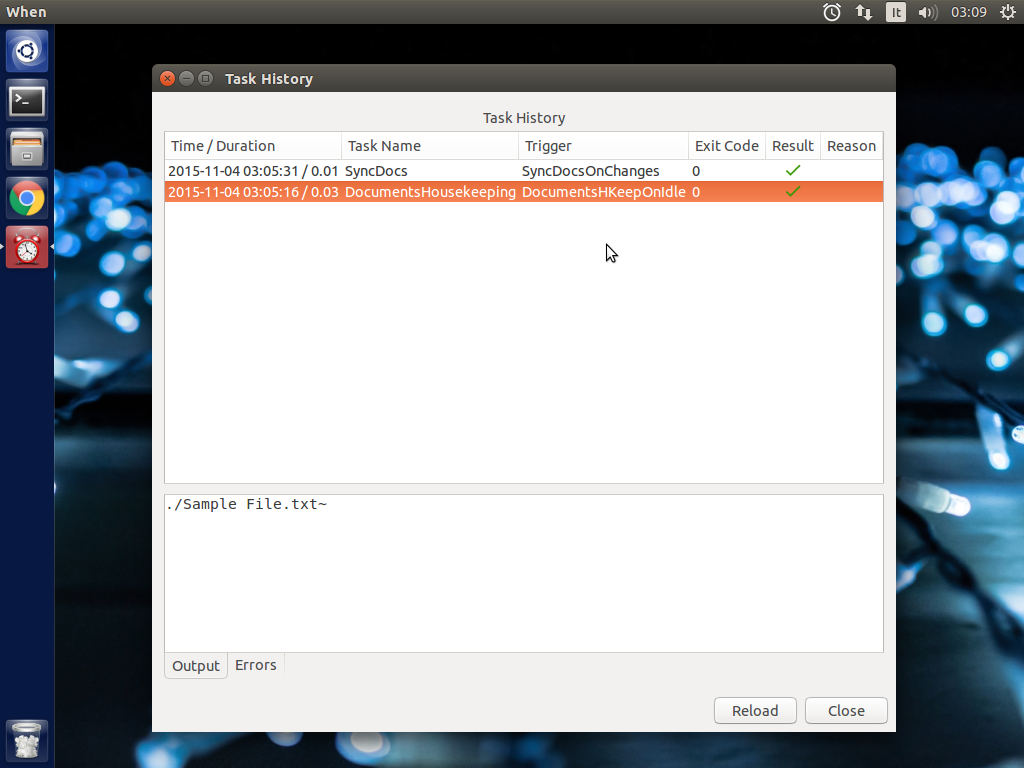
If you click the task line, you can verify what happened in the Output and
Errors tab below: because the script writes the name of each file it deletes
to stdout, the file names appear in the Output pane. Also note that the
desktop trash bin is now full, because Sample File.txt~ was moved there.
As the condition from the previous example (SyncDocsOnChanges) has not been
removed, it has been triggered by the above defined task some seconds later.
Automatic Import
This example shows how to automatically import files from an external storage
device, such as an USB stick, when it’s automatically mounted by the desktop
manager. Suppose we’re using an USB stick to gather data and move it from some
device to our workstation. We assume that the USB stick has been given a label
(we’ll call it USB2GB in this example) and that the device always writes
to the same Data directory on the stick, with no subdirectory: this makes
things easier, because we can use cp or mv to transfer files to the
hard disk.
Ubuntu always mounts external storage devices under the /media directory,
using /media/<label> as the actual mount point. So we can presume that our
USB stick will be mounted on /media/<your_account>/USB2GB, and we can also
be reasonably sure that, if there is a /media/<your_account>/USB2GB/Data
directory around just after insertion of a storage device, it must be the
place to gather data from. Naturally there should be better ways to determine
this. What we will do is blindly copy all files found in the device’s Data
folder to ~/Documents/Gathered, which has been created for this purpose
using the following command:
$ mkdir ~/Documents/Gathered
A shell script will be used to perform the task, just because we’d like to:
- be notified by a badge reporting the operation outcome
- avoid to clutter the Command entry in the When task editor box
- have the script to unmount the USB stick if the copy succeeds.
The last step is less likely to be needed in the real world, as this would cancel any possibility to read the contents of the device unless turning off When.
We will make use of an USB stick (labeled USB2GB through parted or
GParted or any other disk labeling utility) which has a Data directory
with some crafted CSV files (ending in .csv).
Create the Shell Script
Using the same technique shown in the second example, we will create a script
called gather_data.sh in ~/.local/bin, containing the following text:
#!/bin/bash

# this script expects two variables to be defined:
# DEVICE_LABEL is the label given to the removable storage device
# DESTINATION is the destination folder

if [ -z "$DEVICE_LABEL"]; then exit 2; fi
if [ -z "$DESTINATION"]; then exit 2; fi

# shortcuts
SOURCE_BASE="/media/$USER/$DEVICE_LABEL"
SOURCE=$SOURCE_BASE/Data

# exit if it's not the right USB key
if [ ! -d "$SOURCE" ]; then
    exit 2
fi

# copy data from source base to destination
cp -f $SOURCE/*.csv $DESTINATION

# if the task was successful show a badge, if not When enters an error state
if [ "$?" = "0" ]; then
  gvfs-mount -u $SOURCE_BASE
  notify-send -i info "Data Gatherer" "Files successfully transferred, remove device"
else
  exit 2
fi
Once written, do a chmod a+x gather_data.sh in the same directory from a
terminal window.
The gather_data.sh script is available at this location.
Note
A Tip for Photographers
Digital cameras nowadays use mostly SD cards (which contain well known
directories, such as DCIM) to store pictures: with adequate changes
(such as copying *.jpg files from a different directory) this script can
be helpful to transfer photos whenever a SD card is inserted. You can also
use it for storage devices different from SD cards, as long as you correctly
name the default dynamic mount point.
Create the Task
The corresponding task will need to consider the exit status of our script,
since we rely on it to show a failure badge on task failure: this is the
default with When when it’s not instructed to avoid notifications on task
failures. So we will create a task with an adequate name
(GatherExtStorageData) that
- defines the two needed variables:
DEVICE_LABELandDESTINATION(respectively with the label given to the external storage device and the destination folder) - checks that the script exit code is
0.
To do this, we must open the task editor window by selecting Edit Tasks... from the applet menu and then follow these steps:
- enter
GatherExtStorageDatain the Name field - enter
/home/<your_account>/.local/bin/gather_data.shin the Command field (<your_account>has to be replaced by your account name) - define the two needed variables, by writing the variable name
(remember that names are case sensitive!) in the entry below the
variable list, and its value in the adjacent text field and then hitting
the Update button:
DEVICE_LABELshould containUSB2GB, andDESTINATIONthe full path to the destination directory, that is/home/<your_account>/Documents/Gatheredwhere<your_account>is replaced by your account name.
The other entries must be left alone: the default task definition box is already set up to look for task success by checking that the exit code is zero. This is how the task editor box looks like after we defined the task:
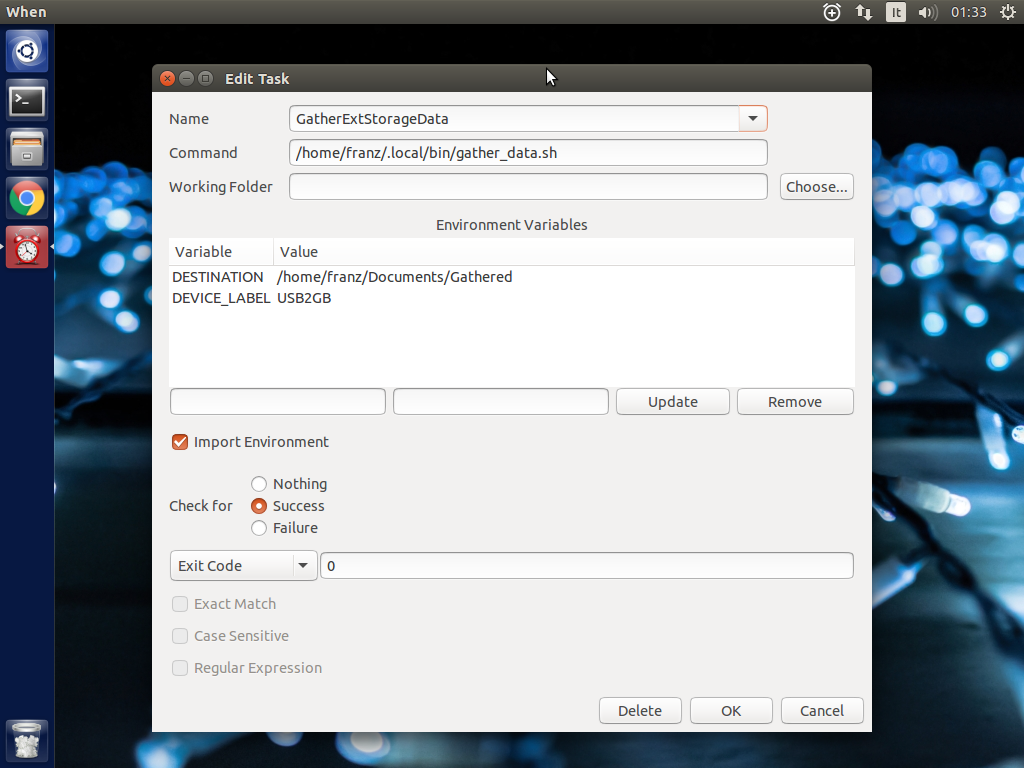
You can click the OK button to store the task item.
Setup the Condition
The most adequate condition type here is the event based one: it allows to choose a subtype that causes it to occur on storage device connection. When is quite generic in this case, and does not actually communicate to the user any details about the actual storage device. However, knowing the expected dynamic mount point helps in writing scripts – like the one above – that only work when the correct device has been inserted.
To define the condition we will select Edit Conditions... entry from the applet menu and carry the following operations when the dialog box appears:
- give the condition a meaningful name, such as
GatherDataOnInsert - select Event from the Type drop-down box: the dialog layout will change and a second drop-down list appears
- select Connect Storage Device from the following drop-down list, that just appeared
- using the combo box under the task list, choose
GatherExtStorageDataand hit the Add button.
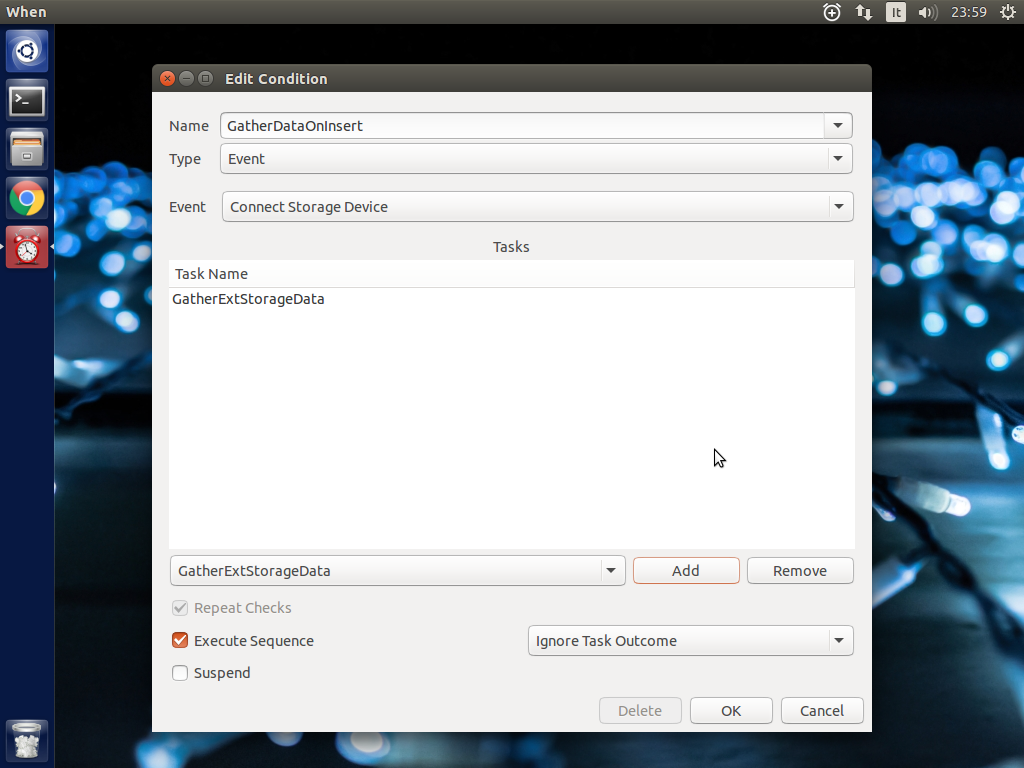
This is sufficient and other entries could be left alone. Click OK to accept.
Cause Something to Happen
We just have to insert the USB key to let When work now. After a while a notification will inform us that the files have been successfully copied to the destination directory. If we open the task history box by choosing Task history... from the applet menu
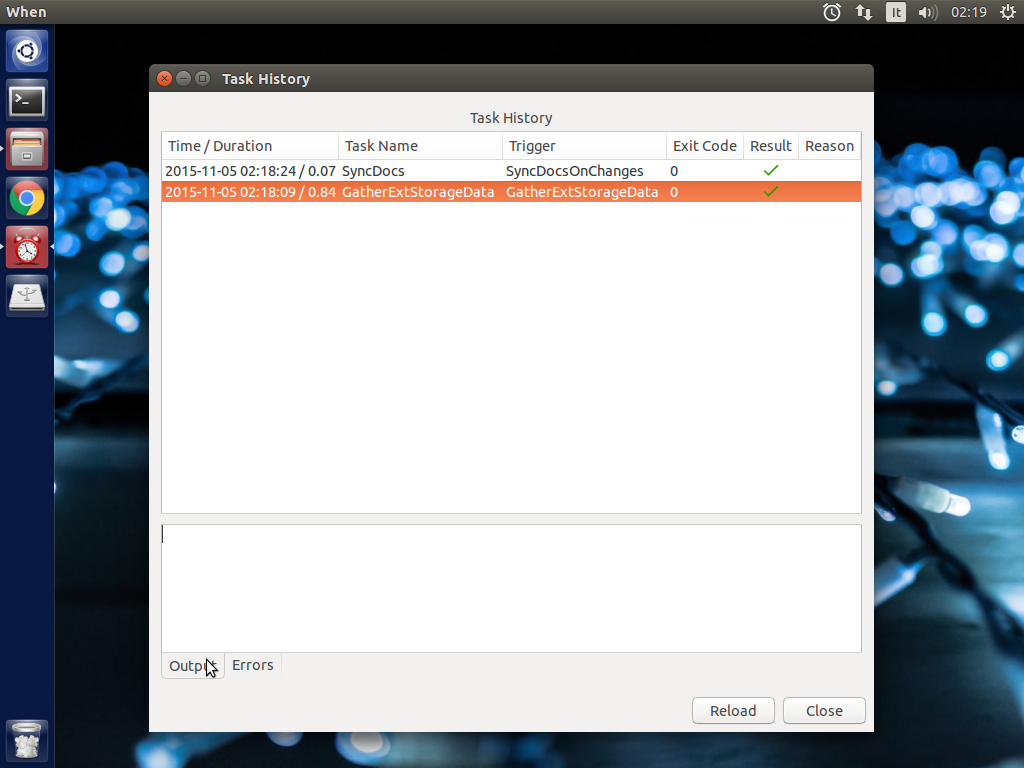
we can check that the task actually succeeded at any time. Using ls, for
instance, or Nautilus, you can also verify that all files have been copied
to the destination.
The Tutorial is an Ongoing Task
This tutorial was formerly a project by itself, and now is part of a bigger project focusing on structured documentation, also to allow it to grow with time: for now it consists of very simple examples, but When can be also used to automate complex tasks. It can be useful for developers, photographers, people that need to automate data gathering or processing and so on: feel free to provide or just even suggest more examples using the issue mechanism in the documentation repository.